.png)
Create your own stunning rolled paper flower starlight
- Beulah Moses

- Nov 12, 2020
- 3 min read
Updated: Nov 13, 2020

Hello, my lovelies,
I hope you are all keeping well and looking forward to the end of this year. I thought I'd start today's post with this poem I crafted yesterday evening as I sat down to write this blog post. I am so excited for this season, more so as we have had such a difficult year. I felt inspired to put my feelings and hopes for the end of the year into these words. I hope the words bring some excitement to you as we look forward to Christmas 2020.
Christmas is weeks away and I am busy completing Christmas makes for clients and also for my own home. Despite the misery and chaos that this dreadful pandemic has brought, there is still much to be grateful for. For one, you are still here. Sadly many are no longer with us and many of us will carry that loss with us forever but still, we must always have hope and believe that this too shall pass.
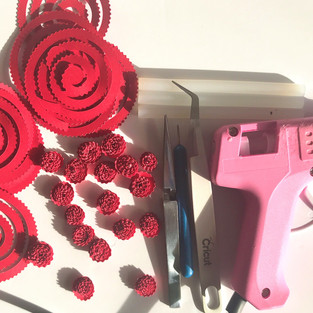
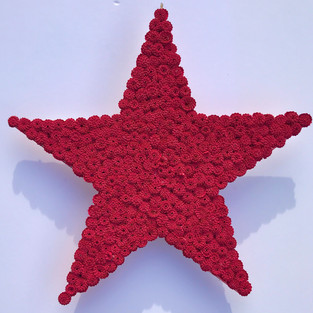
This week I am sharing a simple tutorial for how to make this lovely starlight which would make a perfect window display or a tree decoration. To make this starlight, here is what you will need:

foam board
glue gun
glue gun stick
tweezer or quilling tool
cutting machine or scissors
rolled flower template (you can find free ones on the internet but they are just basic plain ones. I have bought a bundle from design bundles and Etsy at a ridiculously low price.
red acrylic paint or any colour of your choice

method
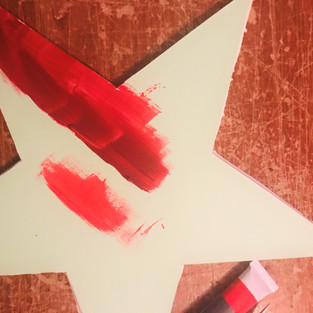
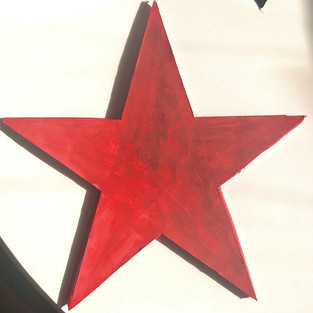
To cut my star perfectly, I first cut out the shape on cardstock using my Cricut. Design Space on Cricut has a shape tool and you can use the star on it but I didn't particularly like the shape so I found a free one here.
Next I glued my star onto the foam board and using my cutting tool, I cut around the shape to get the perfect star.
Because I used red flowers, I painted the star a red colour.
When glueing the flowers onto the star, I did my best to pack them together as tightly as I could without ruining their shape. However, should any gaps show, they will not be obvious because the base is the same colour as the flowers.
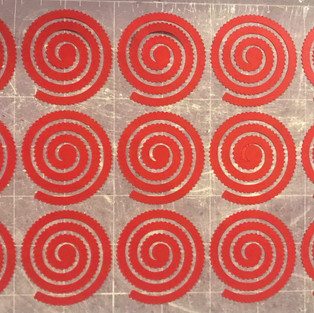
Next, I cut out the rolled flower template on my Cricut. You can do this by hand but it will take time. Having said that, your fine motor skills will be off the charts by the time you are done😁 . Depending on the size of your star, you will need a few hundred of these flowers.
Place the tip of your flower template into your tweezer or the slot of your quilling tool and begin rolling around the tip of the tool. Please see video below.
7. It is a good idea to create different sizes for your flowers because as you place them on the
start, you will find that some areas require smaller flowers while others require larger ones.
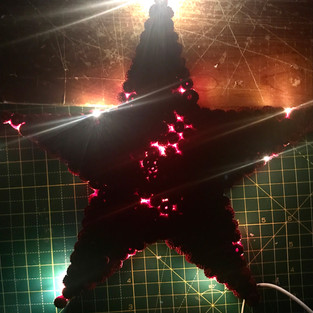
8. Once you have all your flowers made, make a small hole in the middle of your star and feed
the end of the lights so that it comes out on top. The lights I bought are battery powered so
the component that holds the battery will be stuck on the back of the star once you have
finished adding the flowers.
9. Next, carefully wrap your fairy lights around the top or the edge of your star. Once you've
gone around once, You will still have some lights left over. Start glueing your flowers on, then
begin figuring out how you want the rest of your light to be placed. I placed the rest of my
light sort of in the centre of the star and there you have it.
10. Attach ribbon or string to the back of your star and hang wherever you like. I have used mine
as a window display.


I hope you have a go at making this simple but beautifully starlight. If you do, tag me on IG or FB @beulahpapercreations Till next time, enjoy the rest of your week and stay blessed.


Bloomingly yours
Beulah! xx


Comments